Documenting Your Work During Quarantine

To prepare for final critiques and thesis defence, first year MFA Drawing student Ann Dahlman offers tips on documenting your work during quarantine!
It’s important to take quality pictures of your work as you’re creating, and here are some useful tips:
- The first tip is to take a scan of your work instead of photo.
- On apple devices you can do this from Notes. Open a New Note, click the Camera icon and select Scan Documents. If you don’t have an apple device, I read online that you can use Google Drive on your phone to take scans. Bottom right, tap Add, select Scan, and adjust the image. If neither of these are an option for your phone, there are many free scan apps available that will work.
- Adjust the corners to fit your work – it doesn’t need to be square the app will adjust to make a square image, focus more on avoiding unwanted shadows in your images.
- Remember to manually select save. The scans in most apps don’t automatically save, this applies to iPhone as well.
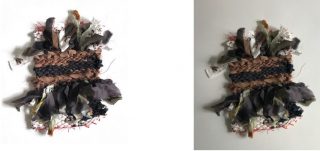
- If you are documenting 3D work, place your work in front of a blank wall or lay on a plain sheet of paper or sheet if you don’t have blank paper. Here you can play with the shadows and be sure to light your project appropriately. I think white works best, but it depends on your piece.
Preparing your Presentation
One major factor we are missing by not working in the studio is the community to bounce ideas off of and receive feedback on things like, ‘Am I done?’
So many of us are going too far, and that’s okay, it’s part of this new learning environment, we are all learning to adjust. One advantage of having a digital critique is that if, for example, you didn’t stop when you should have, then submit an earlier image for your final PDF or folder. If you don’t like the final product, you don’t need to submit a photo of it unless you want to include it as part of the process.
Many of us are required to organize our photos in two PDFs, a final submission PDF and a documentation of research and process PDF. Both should have quality images and short summaries of why you selected them. It’s also important to edit these two documents. Don’t include everything you have done. We have all done so much and our teachers know that we have had a lot of time to create and we have been creating. So be sure edit each file to show a full vision of your work and process, as it relates to your final project, and omit repetitive and unrelated information.
Submit the photo of the work you’re most proud of.
You will also want to have a consistent layout/format for documenting. If you have many pieces, different size, medium, influence, create a format in the caption for each piece.
- Title
- Date
- Dimension
- Medium
- Influence
Consistency is your friend. It will be a lot easier to understand your work through a computer if the viewer can quickly read about the piece in a consistent layout.
Another quick tip: If you are required to present a PowerPoint, there’s an option to save as .ppsx at the bottom of the Save As window. Save your PowerPoint like this to your desktop and when it’s your turn to present, all you have to do it click on that link that will open in the show screen. It’s much smoother and more professional.
Be sure to rehearse what you are going to say in your presentation and anticipate what questions may be asked of you. If no one has questions, you as the presenter can share a question you had while developing your presentation and then answer it for the audience.